If you’ve ever been to Northern Virginia when it’s snowing, then you know it’s best to stay at home. There’s a sense of manic panic here that I can’t imagine could be found in any other major metropolitan area that should be expecting snow.
If you think I’m exaggerating, I’m sure you can find plenty of friends on blogs, Facebook or Twitter to tell you about their usual 30 minute turned 8 hour commute home from work yesterday.
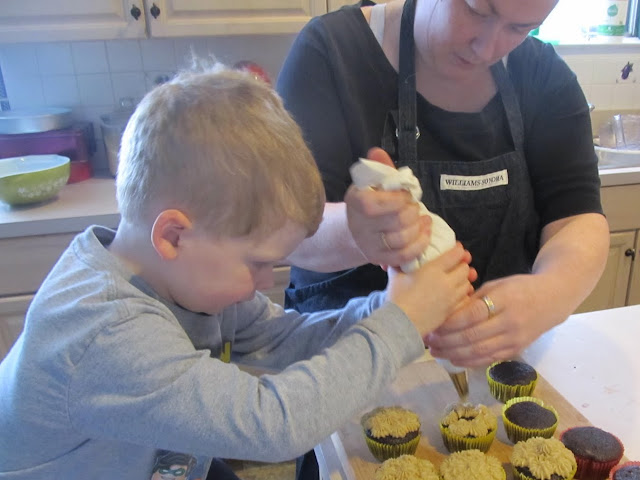
So, in the spirit of efficiency our family hunkered down and has been enjoying being “snowed-in.” Cole has a SEVEN day weekend for about 9 inches worth of snow. For a boy who doesn’t like being cold, this means quite a few indoor projects. With the most gluten sensitive tummy in the house, he loves picking up Elana’s Cookbook and choosing a recipe to bake. But today, Mommy and Cole chose to make something special she’s been craving for nearly 9 months: red velvet cake.
I’ve been searching and searching for a grain-free, dairy-free, sugar-free version of my old favorite, but haven’t had much luck. So, after some research today we (Cole, Finian and our friend Bre) gave it a shot and were more than pleased with the results. If you want to add food coloring, we recommend this brand. However, it’s the cocoa powder and vinegar that give red velvet it’s classic flavorings, not red dye #40.
Originally red velvet cake was called that from the faint red hue they had from a chemical reaction between baking soda, cocoa, buttermilk and vinegar. Only later (not surprisingly) did we add red dye in order to achieve the affect without the recipes needing to be so delicate. Without buttermilk or food coloring, this is by no means “red” – but the flavor is amazing and satisfies my red velvet cravings. It’s even great as a cake, as seen in our German Chocolate Cake Ball recipe!

Ingredients
- 1/2 C palm shortening or butter
- 1/2 C maple syrup (we recommend Grade B)
- 1/2 C honey
- 10 eggs
- 2 Tbsp apple cider vinegar
- 2 Tbsp coconut milk (or buttermilk if you consume dairy)
- 1 Tbsp vanilla extract
- 2/3 C almond flour
- 2/3 C coconut flour
- 2/3 C cocoa powder
- 1/2 tsp baking soda
- 1 tsp sea salt
Instructions
- Beat wet ingredients together until smooth.
- Sift dry ingredients together until incorporated.
- Gradually add the sifted dry ingredients until fully combined.
- Batter will be pretty wet, but thick enough to coat a spoon. Scoop a scant 1/4 cup of batter into lined muffin tin (we recommend silicon liners because nut flours stick to paper).
- Bake at 350 degree for 20 minutes, or until tops are browned and no longer "squishy."
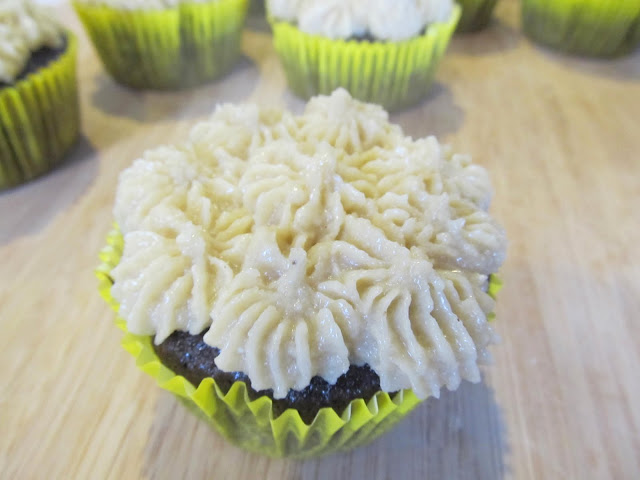
- Let cool completely and top with our Creamy Not Cheese Frosting (below) or Vanilla Bean Frosting (pictured below)
Batter won’t rise much so it’s up to you how full you’d like to make them. We personally use a scant 1/4 cup and leave a lip of the wrapper for icing. If you’d prefer them to be full, then use a heaping 1/4 cup and allow to cook 22 minutes (will then make less than 2 dozen cupcakes).
While waiting for the cupcakes to bake, make the icing. We tried out our own version of a cashew icing to go with it. I can’t say it quite as good as cream cheese frosting, but it was incredibly rich and delicious nonetheless.

Ingredients
- 3 C raw cashews or raw macadamia nuts, soaked and rinsed (overnight, or at least 4 hours)
- 1/4 C maple syrup (we recommend Grade B)
- 1/4 C honey (we recommend raw since it's not being cooked)
- 1 Tbsp vanilla extract
- 1 Tbsp almond extract
- 1 Tbsp apple cider vinegar
- 2 tsp freshly squeezed lemon juice
Instructions
- In a food processor or VitaMix (don’t we wish) combine all ingredients.
- Mix well, scrape the sides and pulse (repeat as necessary) until smooth.
- If mixture does not yet resemble a frosting-like texture (as seen below), pulse in 1 Tablespoon Coconut Milk or Almond Milk (or any milk) a teaspoon at a time until rich and creamy.
- If you want to make it a bit more fancy, fill a piping bag with a wide tip (or cashew pieces will get stuck). Pipe, and enjoy!
Both the cupcake batter and icing make 24 cupcakes.
Note: This post and recipe have been edited. For those of you wondering why, our old recipe used agave (which we don’t eat anymore) and was poorly written to boot! Plus, the photos didn’t do the cupcakes the justice they deserved (below).